Sunday, March 3, 2013

5 Important Photography Marketing Tips

1. Most sales are not made on the first contact. Develop a plan to follow up with potential clients you’ve met. I’ve found that many clients who come to meet me have met with several wedding photographers and will point out that I am the only one who followed up with them after our meeting. This makes a great impression!

2. Establish a brand. I don’t mean a logo, logos are not what can make your business stand out. As photographers we all are offering the same service. What makes us truly different isn’t our equipment, location, or abilities – it’s our personality. Your brand should be your personality and focusing on marketing yourself as well…just you, will help your business become a success. When you are photographing someone’s most prized possessions (children, family, wedding days) they want to know that they can really truly trust the person doing it. Letting them get to know the real you and all your quirks is a great way to brand your business and keep people remembering you.

3. Provide ways for people to connect with you. This can be social networking, blogging, or a website. Simply having a presence on the internet of some kind will make you more marketable. The more presence you have on the web (i.e. the more blogging, face booking, and tweeting) you do the more likely you are to reach potential clients.

4. Boost your search engine rank. Your search engine rank is how high up you show in a google search for a term in your area. If you are in Seattle and you are a wedding photographer it’s likely people will be searching for their photographer by googling “Seattle Wedding Photographer.” Imagine if your website was right up there listed near the top? People would click and inquire more than if your website is listed on page 50 of the search results. Being near the top takes time and effort, but doesn’t cost you a penny if you’re willing to work on your search engine optimization. Doing this has been an incredibly invaluable tool for my business and its one of the secrets to marketing for free.

5. Use Facebook to your benefit. Friend your clients so you can tag them in their images on your business page. It’s easy and it’s a great way to let your clients get to know you and want to recommend you to their friends and family. Every time you tag them in a photo, that photo gets blasted out to their entire friends list which will usually consist of people in the same age range doing similar things (getting married, having babies) and it’s likely many of their friends are local. This is a method of incredibly targeted marketing and it’s free!
Sunday, February 24, 2013

One Week of Free Photoshop & Lightroom Classes

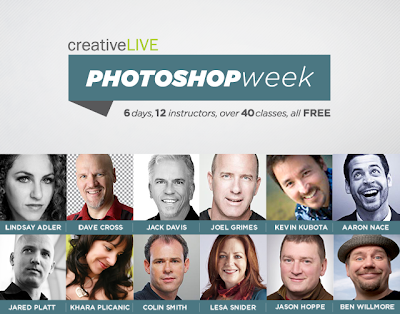
For the first time ever, CreativeLIVE is hosting a week-long Photoshop conference with Photoshop and Lightroom tutorials streaming live for free from February 25 – March 2. While they offer many options for learning retouching techniques, I’m personally looking forward to classes such as Creative Compositing, Combining Photos and Vectors.

Meet the Instructors:


Watch this video to hear more from the instructors:

Friday, February 22, 2013

How Film was Made

This is an interesting film/video (in two parts) showing the process of creating Kodak rollfilm. It is in Dutch with English subtitles. It is interesting to see how it was all done. Most of this work was done in near total darkness.
Read more at


Wednesday, February 20, 2013

54 Must-Have Wedding Photos for Photographers

If you’re an experienced photographer I’m sure you have a list of your own, but hopefully this is a great starting place for those starting to get into photography who don’t want to miss any of those must-have shots!

1. Wedding dress hanging up
2. The shoes
3. The rings
4. The flowers and ceremony decorations
5. Bride getting ready
6. Groom getting ready
7. Groom putting on boutonniere (traditionally the groom’s mom pins it on him)
8. Bride putting on dress/veil
9. Bridal Procession at Ceremony (each set of bridesmaids/groomsmen and anyone else in the wedding party)
10. Bride and Father Walking down the aisle
11. Groom’s expression when he first sees his bride
12. Reciting Vows
13. Exchanging Rings
14. Unity Candle/Sand Ceremony/Any other unique addition to the wedding
15. First Kiss
16. Introduction of the Mr. And Mrs.
17. Signing the Marriage License
18. Receiving Line (if they have one!)
19. Bride with Parents
20. Bride with Mother
21. Bride with Father
22. Bride with Siblings
23. Bride with Parents and Sibings
24. Bride and Groom with Bride’s Parents
25. Bride and Groom with Groom’s Parents
26. Groom with Parents
27. Groom with Mother
28. Groom with Father
29. Groom with Siblings
30. Groom with Parents and Siblings
31. Bride and Groom with Flowergirl/Ringbearers
32. Bride with Bridesmaids
33. Groom with Bridesmaids
34. Bride with Groomsmen
35. Groom with Groomsmen
36. Bride, Groom, Bridesmaids, and Groomsmen
37. Bride with Maid of Honor
38. Bride with individual bridesmaids
39. Groom with Best Man
40. Groom with individual groomsmen
41. Bride Portraits
42. Groom Portraits
43. Bride and Groom Portraits
44. Arrival of Wedding Party at Reception
45. Cake
46. Reception Decorations
47. Toasts
48. Cake Cutting
49. First Dance
50. Father and bride dance
51. Mother and groom dance
52. Garter Toss
53. Bouquet Toss
54. Bride and Groom Farewell/Driving Away

These of course vary depending on the bride and groom’s families and wedding parties as well as their individual wedding and anything extra that might be happening. This list is just a starting place of must-have shots and all these family photos in there can vary greatly. I strongly suggest you consult with each bride and groom individually to ensure you are aware of any family situations and any extra family photos they may or may not want.

Tuesday, February 19, 2013

8 Ways to Market Your Photography For Free


1. Facebook – This one is obvious. If you don’t already, start a business page, start a personal page, start friending your clients and tagging them in the photos you share on your business page. That alone can bring you many referrals.

2. Website – It’s worth the investment. Having a corner of your own of the internet that people can link back to and a place that’s searchable online is important. When people search “Los Angeles Wedding Photographer” and you’re in Los Angeles if your website shows up in their search results you’ve just had some free advertising.

3. Craigslist – Yep, I suggested it. There’s absolutely no harm in putting up an ad and regularly searching various sections of Craigslist for people looking for photographers. Sometimes you’ll luck out and find amazing clients. I’ve found one client through Craigslist who comes back time after time for her photos and has recommended many of her friends to me as well.

4. Wedding Websites – All those places like Wedding Wire and The Knot usually allow you to have a free listing there. Go for it, there’s no harm. I’ve not once found a client directly through these websites, but simply having those websites linking back to my website improves my search rank when brides are searching for a photographer.

5. Local Businesses – Look for other small business owners who may be able to trade services with you. Know a groomer? Offer to come by one afternoon and snap some photos of them at work and the cute dogs that come in. Print some of those and offer to put them up in their shop and leave business cards. Offer to let them put those photos online with the catch being that they link to your website.

6. Business Cards and Car Signs – These things are twofold for me. When I go somewhere and get out of my car and someone might see my car sign they might ask for a business card. It’s a great conversation starter, even if sometimes you have to start the conversations. Be friendly, smile, say hi to people when you’re out in public – those simple friendly gestures can be conversation starters and an opportunity to mention your business and give them a card.

7. Contact Local Businesses – This has been a key way for me to market my business. It can also be time consuming. Periodically you can search online for wedding planners, or wedding venues, or midwives and birthing centers. Write down their contact information and make the effort to send each one an individual email telling them who you are, what you do, and that you’d like to offer their clients a discount. If you’re into wedding photography this has been especially helpful. Many wedding planners or venues will link to you from their websites or want to meet in person and get information from you so they can recommend you to their clients.

8. Share Photos – When you shoot at a wedding venue and work with a florist, a wedding planner, a DJ, and more at a wedding make sure you connect with all of these professionals and get their information. I put the photos they might like to use on their websites online for them to download at no cost with only the rule that they must link to my website if they use them online. What a great way for brides to see other wedding professionals recommending you! This can also apply for other types of shoots sometimes. If you do birth photography or newborn photography maybe you want to connect with local hospitals and see if they would like to display some photos in their labor and delivery section. You can print and frame them and give them to the hospital (put your website on the photos). If you do a photo session at a local pumpkin patch give the photos of the kids and families to the owners so they can use those photos online and link back to you.

Monday, February 18, 2013

10 Things Your Photography Website Needs

1. Information section about your business, what your photography includes, and information about pricing. You can decide what’s best for you with regards to sharing pricing on your website or having people contact you for pricing.

2. Recent sessions area that can be updated frequently. Websites that are a portfolio style tend to be static. You set them up, you put in your info and images and you’re done and never mess with it again. A good way to ensure that visitors who come by several times see something new is to have a section with some of your recent photoshoots that you update once a month or once every couple weeks.

3. Video or Photo Section about “Behind the Scenes” – people love getting to know you and seeing what it would be like to work with you. Have your assistant, helper, or a friend of your client who attends the session snap some photos of you at work. Photos of you posing people with your clients laughing and having a good time will go a long way to impressing new clients with your fun and outgoing attitude. If it looks like it’s fun to work with you they’ll want their photos done with you.


4. Photo of Yourself – People want to see who you are, how you dress, and what you’re like. Of course, a photography website is all about you, but people being able to see you will help them develop a trust in you and your work.

5. About Me Section – This is one of the hardest parts to write on a website. Writing about yourself isn’t easy. This bio section of your website is the perfect way to have potential clients feel like they can relate to you. When people can relate to you, they build trust with you and are more likely to book with you if they find you have something in common with them.

6. Share your Portfolio – so what’s the perfect amount of images? I’ve tried various setups of the portfolio and some were too complex with the wedding portfolio having different sections of the wedding and the portraits portfolio being separated into various types of portraits. This seemed to be a bit complex and took too much time for my visitors to see. Each small gallery within those sections had maybe 40-50 photos in it so there was a lot of stuff to look through. I’ve since learned it’s best to keep it simple. You don’t want to have too little photos, but you don’t want to have too many either. There’s no right way to do this, but figure out what works for you.

7. Way to Contact You – You can decide whether you prefer phone or email contact. I know many photographers who prefer only email, but I prefer either. I try to be reachable for any form of contact, whatever is more comfortable with my clients is fine with me so I have both a phone and an email listed.

8. A blog – I know some folks think blogs are old school and they can be. Having a blog means that your website isn’t static, it has current information being updated on a regular basis. It’s great for visitors to be able to see that you’re active recently. Blogging is also hard because writing doesn’t come naturally for everyone, but a blog can also greatly boost your search engine rank too and put you higher up in google search results, which then results in inquiries from potential clients without having to pay for advertising! If blogging is hard, write some personal posts, put up some easy short posts, and the occasional recent photo sessions too!

9. Client Section – Whether it be a gallery link you email your clients, or a place where they can login with a password having a section for your clients to view photos and order them online is a great tool. Your clients will be able to share their images with friends and family.

10. Social Networking – I know I know, I can hear the groans now. Social networking isn’t always my favorite thing either, but it’s a great tool to add to your website if your clients can find you on popular networking sites like Facebook and Twitter.

Geotagging Your Photos with Lightroom

Geo tagging your photos can be a real pain if you don't have a device that can do it out of the box. Luckily there are other ways to achieve the same result, it just takes a bit more work.

Equipment You will need:
  • Smart Phone with GPS or handheld GPS device
  • Camera (compact, DSLR, mirrorless, etc.)
  • Lightroom 4

NOTE: some DSLR cameras have the ability to attach a GPS module. If you have the module then all you need to do is attach it and your photos will be tagged auto magically.

Synchronize
To get the best results you must synchronize the time of your GPS device and your camera as closely as possible. This will allow the software to match up the images and locations more accurately.

It is not necessary to have the same time zone set on both devices, but it helps. Lightroom 4 can adjust this during the loading process if they are different.

Photography
When you go out to take some photos whether it be in the wilderness or the city all you need to do is turn on your GPS device and keep it on for the duration of your excursion. When you are done just shut the GPS off.

Processing
OK, now you are back home. This is where the process gets a little more complicated.

First things first, you need to download your images and import them into Lightroom. I won't cover this part of the process in any detail since many people use different workflows. The basic premise is that you start Lightroom, insert the memory card into your computer and download the images that you want to keep.

The next step involves downloading the data from your GPS device. This is quite easy once you figure it out, unfortunately every device is different. Basically you want to export the data from your trip as a .GPX file. Save this file somewhere on your computer where you can find it easily.

Tagging

Step 1.
You first need to click on the Map mode which is located at the top right hand side of the Lightroom interface. Click on the ~icon at the bottom of the screen just above the filmstrip.

Step 2.
Select "Load Tracklog" and locate the .GPX file on your computer and click Open.

Click "Load Tracklog"
Select the correct track and time from the list of available tracks.

NOTE: if the timezone offset is different on your camera and GPS device you can adjust that now by "Set Time Zone Offset".

Step 3.
Click "Select Photos on Tracklog"
Now click on the ~ icon and click "Select photos on Tracklog". If everything goes well Lightroom should select all the images that you took on that track. If Lightroom selected any photos you should see them selected in the filmstrip (located at the bottom of the screen).

Step 4.
Click "Auto-Tag X Selected Photos"
You are almost done, click ~ again and click "Auto tag X Selected Photos" where X is the number of photos located along the track.

Step 5.
Make any minor adjustments to the image locations if you think they are incorrect.

Step 6.
If you have additional tracks that you want to tag you can select them from the Track listing and repeat steps 3-5.

Once you have done the whole process a couple of times it gets easier. This can save a lot of time if you were tagging your images manually.
Related Posts Plugin for WordPress, Blogger...