Photography in general is a beautiful art form but there are some many different forms of photography. This article discusses those different forms in enough detail to give the reader a clear picture of each form in the hopes that they will decide the right form of photography based on their personality and interests.
Photography is a true art form that encompasses many different avenues. Portrait photography and landscape photography are perhaps, the most popular types of photography, but there are far from being the only forms of photography. Whether you are an amateur photographer or a professional chances are that you are going to have a favorite type of photography. Keep in mind that some types of photography encompass two or more other types of photography, so it should be fairly easy to pick a photography specialty based on your personality. I am going to go over different types of photography in hopes of helping you decide which one is right for you.
Photojournalism
Photojournalism involves taking photos of facts as they happened. This style of photography requires the knowledge to capture human emotion in a single photograph and can take years of practice to perfect. In photojournalism, the photo will depict just one scene or event. These photographs are used to attract readers for news stories.
Documentary
This is very similar to photojournalism, but in documentary photography the photographs are meant for historical evidence of an era, not the present time. Documentary photographers also need experiences and training to capture raw human emotion.
Macrophotography
Macrophotography refers to photos that are taken at a very close range. In order to become a macro photographer, the proper professional film equipment (pfe) is essential. Lenses and other needed equipment are expensive and require advanced knowledge to learn.
Action
Although there are different types of action photography, sports photography is the most popular. The photographer must study the subject and anticipate the next move in order to get a good shot. This holds true for sports photographers as well as those photographing animals in nature, and even taking photos of children running around the house.
Glamor
So many consider glamour photography to be pornographic, but it is an art form that shows the beauty of the human body. They focus on light and shadows to show the human body at its best. While being sexy these photos are done tastefully and respectfully.
Wedding
Many photographs of this style are post processed for creative effects. A plethora of wedding photographs are given a vintage or timeless look in post processing. This is a unique blend of portrait photography and documentary photography.
Advertising
This a career form of photography for many people and is yet another type of photography that encompasses different forms. It can include macrophotography, glamor photography, and portraiture. The photographs need to be interesting and catch the eye of consumers in print.
Travel
Travel photography can include portraiture, documentary, advertising, and glamor photography. These photographs depict life or events of a particular place in the world. This can be achieved through portraits or by landscape photography.
Portrait
This might be the most popular type of photography and is certainly one of the oldest. Subjects can be people or animals. Portrait photography serves to capture the unique personality of the subject in a photograph.
Art
Art photography can include photographs on many different subjects. Some photographers use animals or nature as subjects, others may use objects posed, or even an interesting view of everyday objects. No matter what the subject is, art photography must be aesthetic.
Showing posts with label Photography Tips. Show all posts
Showing posts with label Photography Tips. Show all posts
Friday, April 26, 2013
Thursday, April 25, 2013
7 Easy Photography Tips for Beginners
Like any other hobbies and crafts, to learn photography means having to understand the basic photography tips you need to know.
Like any other hobbies and crafts, to learn photography means having to understand the basic photography tips you need to know. If you are that persistent to mastering this craft, then it is important to read on the following photography tips for beginners.
1. Do not hesitate in taking lots and lots of photos. Remember that this is among the photography tips that will help you learn and figure what best works for you or which ones are bad. This will also help you develop and come up with your distinct style.

2.Always put creativity first and never copy someone else's style. If everyone else is taking the same angle from the subjects and in most pictures, find another.
3.Carrying your camera all the time is also a good thing to start in order to learn photography. You will never know when the perfect photo opp would come.
4. Of course, make sure you read and leaf through your camera manual. Although this can be quite boring, the basic ways to use a camera will help you improve and learn photography and its art.
5. Backing up your photos is also one of the most effective photography tips. You can create a blog for this or burn this into a CD, just in case the computer crashes.
6. Go with a group. Hanging out with beginners on a shoot will also help you learn photography best.
7. Most of all, relax and keep your cool. Exerting too much effort in something can compromise the enjoyment and fun you are supposed to have while learning photography. Learn to enjoy first the learning process and you will see that you can be good at it eventually. After all, photography should be a passion that you enjoy.
Wednesday, April 24, 2013
Types of Photography
There are a lot of different types of photography. Some you may have heard of before and others you may not have. In this article I will try to list all the types of photography and explain a bit about the more popular ones. So if you're just starting out or you've been a photographer for a long time read on to find out what other types of photography are available to you.
There are a lot of different types of photography. Some you may have heard of before and others you may not have. In this article I will try to list all the types of photography and explain a bit about the more popular ones. So if you're just starting out or you've been a photographer for a long time read on to find out what other types of photography are available to you.
The big list of types of photography
First of all let me address all the types of photography. This is a long list and because of the nature of photography new forms comeout all the time. Starting from A the types are: Advertising, Aerial, Architectural, Astronomical, Baby, Black and White, Cityscape, Commercial, Concert, Digital, Documentary, Equine, Family, Fine art, Food, Fashion, Infrared, Landscape, Macro, Nature, Night, Pet, Portrait, Seascape, Travel, Underwater, Wedding and Wildlife photography. As you can see there are many, many forms of photography. Most people simply choose one and specialize in that form, some forms more popular than others.
Popular Types of Photography
Black and White photography is an old and popular type of photography. Originally camera's only took black and white photo's but these days it is used to capture the natural essence and beauty of a person or object. It gives the photo a timeless, regal look that you just cannot get with color photo's. However if you're after exuberant picture filled with life and color you're going to need to pick another form of photography.
Baby or family / portrait photography is also a very popular form to get into. It has a lot of commercial appeal and everyone wants pictures of their babies and family to preserve their precious memories. Go into any household in the world and you will see one of these hanging on a wall or sitting on a shelf. When people think of photography this is usually what they think of. Pet photography can also fall under this category to some extent. Most families have pets and pictures of when they were puppies, 1 year old, 2, etc.
Wedding photography is also one of the timeless and most sought after photography. Such a magical occasion is the wedding that you will never see one go by without a photographer present. Even couples that go to Vegas to elope over the weekend have pictures of their wedding! Wedding photography can be a lot harder than many of the other forms because you cannot set the stage and control the lighting. A wedding is a fluid event and so you must be quick on your feet and have a good eye for when to take that perfect shot. Being able to adapt is a must for wedding photography.
Travel photography is becoming more and more common in the digital age. You'd be hard pressed to find a family or group of people travelling these days that does not have a digital camera with them. And with so many beautiful landscapes and architechtural wonders around the world you can see why. People these days rarely get the chance to go on a holiday and they want to remember that stress free fun time for as long as they can. Snapping some pics of the eiffel tower or the grand canyon and having them around the house is a great way to do this. This form of photography is great for the casual photo fanatic.
So grab your camera and get out there.
There are a lot of different types of photography. Some you may have heard of before and others you may not have. In this article I will try to list all the types of photography and explain a bit about the more popular ones. So if you're just starting out or you've been a photographer for a long time read on to find out what other types of photography are available to you.

The big list of types of photography
First of all let me address all the types of photography. This is a long list and because of the nature of photography new forms comeout all the time. Starting from A the types are: Advertising, Aerial, Architectural, Astronomical, Baby, Black and White, Cityscape, Commercial, Concert, Digital, Documentary, Equine, Family, Fine art, Food, Fashion, Infrared, Landscape, Macro, Nature, Night, Pet, Portrait, Seascape, Travel, Underwater, Wedding and Wildlife photography. As you can see there are many, many forms of photography. Most people simply choose one and specialize in that form, some forms more popular than others.
Popular Types of Photography
Black and White photography is an old and popular type of photography. Originally camera's only took black and white photo's but these days it is used to capture the natural essence and beauty of a person or object. It gives the photo a timeless, regal look that you just cannot get with color photo's. However if you're after exuberant picture filled with life and color you're going to need to pick another form of photography.
Baby or family / portrait photography is also a very popular form to get into. It has a lot of commercial appeal and everyone wants pictures of their babies and family to preserve their precious memories. Go into any household in the world and you will see one of these hanging on a wall or sitting on a shelf. When people think of photography this is usually what they think of. Pet photography can also fall under this category to some extent. Most families have pets and pictures of when they were puppies, 1 year old, 2, etc.
Wedding photography is also one of the timeless and most sought after photography. Such a magical occasion is the wedding that you will never see one go by without a photographer present. Even couples that go to Vegas to elope over the weekend have pictures of their wedding! Wedding photography can be a lot harder than many of the other forms because you cannot set the stage and control the lighting. A wedding is a fluid event and so you must be quick on your feet and have a good eye for when to take that perfect shot. Being able to adapt is a must for wedding photography.
Travel photography is becoming more and more common in the digital age. You'd be hard pressed to find a family or group of people travelling these days that does not have a digital camera with them. And with so many beautiful landscapes and architechtural wonders around the world you can see why. People these days rarely get the chance to go on a holiday and they want to remember that stress free fun time for as long as they can. Snapping some pics of the eiffel tower or the grand canyon and having them around the house is a great way to do this. This form of photography is great for the casual photo fanatic.
So grab your camera and get out there.
Sunday, March 3, 2013
5 Important Photography Marketing Tips
1. Most sales are not made on the first contact. Develop a plan to follow up with potential clients you’ve met. I’ve found that many clients who come to meet me have met with several wedding photographers and will point out that I am the only one who followed up with them after our meeting. This makes a great impression!
2. Establish a brand. I don’t mean a logo, logos are not what can make your business stand out. As photographers we all are offering the same service. What makes us truly different isn’t our equipment, location, or abilities – it’s our personality. Your brand should be your personality and focusing on marketing yourself as well…just you, will help your business become a success. When you are photographing someone’s most prized possessions (children, family, wedding days) they want to know that they can really truly trust the person doing it. Letting them get to know the real you and all your quirks is a great way to brand your business and keep people remembering you.

3. Provide ways for people to connect with you. This can be social networking, blogging, or a website. Simply having a presence on the internet of some kind will make you more marketable. The more presence you have on the web (i.e. the more blogging, face booking, and tweeting) you do the more likely you are to reach potential clients.
4. Boost your search engine rank. Your search engine rank is how high up you show in a google search for a term in your area. If you are in Seattle and you are a wedding photographer it’s likely people will be searching for their photographer by googling “Seattle Wedding Photographer.” Imagine if your website was right up there listed near the top? People would click and inquire more than if your website is listed on page 50 of the search results. Being near the top takes time and effort, but doesn’t cost you a penny if you’re willing to work on your search engine optimization. Doing this has been an incredibly invaluable tool for my business and its one of the secrets to marketing for free.
5. Use Facebook to your benefit. Friend your clients so you can tag them in their images on your business page. It’s easy and it’s a great way to let your clients get to know you and want to recommend you to their friends and family. Every time you tag them in a photo, that photo gets blasted out to their entire friends list which will usually consist of people in the same age range doing similar things (getting married, having babies) and it’s likely many of their friends are local. This is a method of incredibly targeted marketing and it’s free!
Sunday, February 24, 2013
One Week of Free Photoshop & Lightroom Classes
For the first time ever, CreativeLIVE is hosting a week-long Photoshop conference with Photoshop and Lightroom tutorials streaming live for free from February 25 – March 2. While they offer many options for learning retouching techniques, I’m personally looking forward to classes such as Creative Compositing, Combining Photos and Vectors.
Meet the Instructors:
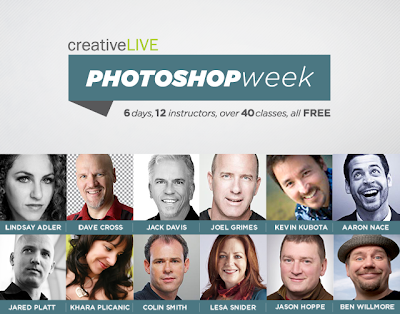
Watch this video to hear more from the instructors:
Wednesday, February 20, 2013
54 Must-Have Wedding Photos for Photographers
If you’re an experienced photographer I’m sure you have a list of your own, but hopefully this is a great starting place for those starting to get into photography who don’t want to miss any of those must-have shots!
2. The shoes
3. The rings
4. The flowers and ceremony decorations
5. Bride getting ready
6. Groom getting ready
7. Groom putting on boutonniere (traditionally the groom’s mom pins it on him)
8. Bride putting on dress/veil
9. Bridal Procession at Ceremony (each set of bridesmaids/groomsmen and anyone else in the wedding party)
10. Bride and Father Walking down the aisle
11. Groom’s expression when he first sees his bride
12. Reciting Vows
13. Exchanging Rings
14. Unity Candle/Sand Ceremony/Any other unique addition to the wedding
15. First Kiss
16. Introduction of the Mr. And Mrs.
17. Signing the Marriage License
18. Receiving Line (if they have one!)
19. Bride with Parents
20. Bride with Mother
21. Bride with Father
22. Bride with Siblings
23. Bride with Parents and Sibings
24. Bride and Groom with Bride’s Parents
25. Bride and Groom with Groom’s Parents
26. Groom with Parents
27. Groom with Mother
28. Groom with Father
29. Groom with Siblings
30. Groom with Parents and Siblings
31. Bride and Groom with Flowergirl/Ringbearers
32. Bride with Bridesmaids
33. Groom with Bridesmaids
34. Bride with Groomsmen
35. Groom with Groomsmen
36. Bride, Groom, Bridesmaids, and Groomsmen
37. Bride with Maid of Honor
38. Bride with individual bridesmaids
39. Groom with Best Man
40. Groom with individual groomsmen
41. Bride Portraits
42. Groom Portraits
43. Bride and Groom Portraits
44. Arrival of Wedding Party at Reception
45. Cake
46. Reception Decorations
47. Toasts
48. Cake Cutting
49. First Dance
50. Father and bride dance
51. Mother and groom dance
52. Garter Toss
53. Bouquet Toss
54. Bride and Groom Farewell/Driving Away
These of course vary depending on the bride and groom’s families and wedding parties as well as their individual wedding and anything extra that might be happening. This list is just a starting place of must-have shots and all these family photos in there can vary greatly. I strongly suggest you consult with each bride and groom individually to ensure you are aware of any family situations and any extra family photos they may or may not want.
Tuesday, February 19, 2013
8 Ways to Market Your Photography For Free

2. Website – It’s worth the investment. Having a corner of your own of the internet that people can link back to and a place that’s searchable online is important. When people search “Los Angeles Wedding Photographer” and you’re in Los Angeles if your website shows up in their search results you’ve just had some free advertising.
3. Craigslist – Yep, I suggested it. There’s absolutely no harm in putting up an ad and regularly searching various sections of Craigslist for people looking for photographers. Sometimes you’ll luck out and find amazing clients. I’ve found one client through Craigslist who comes back time after time for her photos and has recommended many of her friends to me as well.
4. Wedding Websites – All those places like Wedding Wire and The Knot usually allow you to have a free listing there. Go for it, there’s no harm. I’ve not once found a client directly through these websites, but simply having those websites linking back to my website improves my search rank when brides are searching for a photographer.
5. Local Businesses – Look for other small business owners who may be able to trade services with you. Know a groomer? Offer to come by one afternoon and snap some photos of them at work and the cute dogs that come in. Print some of those and offer to put them up in their shop and leave business cards. Offer to let them put those photos online with the catch being that they link to your website.
6. Business Cards and Car Signs – These things are twofold for me. When I go somewhere and get out of my car and someone might see my car sign they might ask for a business card. It’s a great conversation starter, even if sometimes you have to start the conversations. Be friendly, smile, say hi to people when you’re out in public – those simple friendly gestures can be conversation starters and an opportunity to mention your business and give them a card.
7. Contact Local Businesses – This has been a key way for me to market my business. It can also be time consuming. Periodically you can search online for wedding planners, or wedding venues, or midwives and birthing centers. Write down their contact information and make the effort to send each one an individual email telling them who you are, what you do, and that you’d like to offer their clients a discount. If you’re into wedding photography this has been especially helpful. Many wedding planners or venues will link to you from their websites or want to meet in person and get information from you so they can recommend you to their clients.
8. Share Photos – When you shoot at a wedding venue and work with a florist, a wedding planner, a DJ, and more at a wedding make sure you connect with all of these professionals and get their information. I put the photos they might like to use on their websites online for them to download at no cost with only the rule that they must link to my website if they use them online. What a great way for brides to see other wedding professionals recommending you! This can also apply for other types of shoots sometimes. If you do birth photography or newborn photography maybe you want to connect with local hospitals and see if they would like to display some photos in their labor and delivery section. You can print and frame them and give them to the hospital (put your website on the photos). If you do a photo session at a local pumpkin patch give the photos of the kids and families to the owners so they can use those photos online and link back to you.
Monday, February 18, 2013
10 Things Your Photography Website Needs

2. Recent sessions area that can be updated frequently. Websites that are a portfolio style tend to be static. You set them up, you put in your info and images and you’re done and never mess with it again. A good way to ensure that visitors who come by several times see something new is to have a section with some of your recent photoshoots that you update once a month or once every couple weeks.
3. Video or Photo Section about “Behind the Scenes” – people love getting to know you and seeing what it would be like to work with you. Have your assistant, helper, or a friend of your client who attends the session snap some photos of you at work. Photos of you posing people with your clients laughing and having a good time will go a long way to impressing new clients with your fun and outgoing attitude. If it looks like it’s fun to work with you they’ll want their photos done with you.
4. Photo of Yourself – People want to see who you are, how you dress, and what you’re like. Of course, a photography website is all about you, but people being able to see you will help them develop a trust in you and your work.
5. About Me Section – This is one of the hardest parts to write on a website. Writing about yourself isn’t easy. This bio section of your website is the perfect way to have potential clients feel like they can relate to you. When people can relate to you, they build trust with you and are more likely to book with you if they find you have something in common with them.
6. Share your Portfolio – so what’s the perfect amount of images? I’ve tried various setups of the portfolio and some were too complex with the wedding portfolio having different sections of the wedding and the portraits portfolio being separated into various types of portraits. This seemed to be a bit complex and took too much time for my visitors to see. Each small gallery within those sections had maybe 40-50 photos in it so there was a lot of stuff to look through. I’ve since learned it’s best to keep it simple. You don’t want to have too little photos, but you don’t want to have too many either. There’s no right way to do this, but figure out what works for you.
7. Way to Contact You – You can decide whether you prefer phone or email contact. I know many photographers who prefer only email, but I prefer either. I try to be reachable for any form of contact, whatever is more comfortable with my clients is fine with me so I have both a phone and an email listed.
8. A blog – I know some folks think blogs are old school and they can be. Having a blog means that your website isn’t static, it has current information being updated on a regular basis. It’s great for visitors to be able to see that you’re active recently. Blogging is also hard because writing doesn’t come naturally for everyone, but a blog can also greatly boost your search engine rank too and put you higher up in google search results, which then results in inquiries from potential clients without having to pay for advertising! If blogging is hard, write some personal posts, put up some easy short posts, and the occasional recent photo sessions too!
9. Client Section – Whether it be a gallery link you email your clients, or a place where they can login with a password having a section for your clients to view photos and order them online is a great tool. Your clients will be able to share their images with friends and family.
10. Social Networking – I know I know, I can hear the groans now. Social networking isn’t always my favorite thing either, but it’s a great tool to add to your website if your clients can find you on popular networking sites like Facebook and Twitter.
Geotagging Your Photos with Lightroom
Geo tagging your photos can be a real pain if you don't have a device that can do it out of the box. Luckily there are other ways to achieve the same result, it just takes a bit more work.

NOTE: some DSLR cameras have the ability to attach a GPS module. If you have the module then all you need to do is attach it and your photos will be tagged auto magically.
Equipment You will need:
- Smart Phone with GPS or handheld GPS device
- Camera (compact, DSLR, mirrorless, etc.)
- Lightroom 4
NOTE: some DSLR cameras have the ability to attach a GPS module. If you have the module then all you need to do is attach it and your photos will be tagged auto magically.
Synchronize
To get the best results you must synchronize the time of your GPS device and your camera as closely as possible. This will allow the software to match up the images and locations more accurately.
It is not necessary to have the same time zone set on both devices, but it helps. Lightroom 4 can adjust this during the loading process if they are different.
Photography
When you go out to take some photos whether it be in the wilderness or the city all you need to do is turn on your GPS device and keep it on for the duration of your excursion. When you are done just shut the GPS off.
When you go out to take some photos whether it be in the wilderness or the city all you need to do is turn on your GPS device and keep it on for the duration of your excursion. When you are done just shut the GPS off.
Processing
OK, now you are back home. This is where the process gets a little more complicated.
First things first, you need to download your images and import them into Lightroom. I won't cover this part of the process in any detail since many people use different workflows. The basic premise is that you start Lightroom, insert the memory card into your computer and download the images that you want to keep.
The next step involves downloading the data from your GPS device. This is quite easy once you figure it out, unfortunately every device is different. Basically you want to export the data from your trip as a .GPX file. Save this file somewhere on your computer where you can find it easily.
Tagging
Step 1.
You first need to click on the Map mode which is located at the top right hand side of the Lightroom interface. Click on the ~icon at the bottom of the screen just above the filmstrip.
Step 2.
You first need to click on the Map mode which is located at the top right hand side of the Lightroom interface. Click on the ~icon at the bottom of the screen just above the filmstrip.
Step 2.
Select "Load Tracklog" and locate the .GPX file on your computer and click Open.
Click "Load Tracklog"
Select the correct track and time from the list of available tracks.
NOTE: if the timezone offset is different on your camera and GPS device you can adjust that now by "Set Time Zone Offset".
Step 3.
Click "Select Photos on Tracklog"
Now click on the ~ icon and click "Select photos on Tracklog". If everything goes well Lightroom should select all the images that you took on that track. If Lightroom selected any photos you should see them selected in the filmstrip (located at the bottom of the screen).
Step 4.
Click "Auto-Tag X Selected Photos"
You are almost done, click ~ again and click "Auto tag X Selected Photos" where X is the number of photos located along the track.
Step 5.
Make any minor adjustments to the image locations if you think they are incorrect.
Step 6.
If you have additional tracks that you want to tag you can select them from the Track listing and repeat steps 3-5.
Once you have done the whole process a couple of times it gets easier. This can save a lot of time if you were tagging your images manually.
Wednesday, February 13, 2013
Blocking The Print Feature On Facebook To Protect Your Photos
 Do you know how easy it is for your friends in Facebook to print out your photographs at a local big box store such as Walmart or Target?
1. Be properly compensated BEFORE you release them on Facebook
2. Keep your image size small – a 300 pixel, 72 DPI print isn’t going to print well no matter where your client takes it.
3. Understand your rights to your images greatly diminish when you release them to any online social site.
And now once again, Facebook is making things a little easier for the average member, and a little more difficult for the photographer.
If you’ve tagged a client in a photograph, your client now has access to printing that photo at any of the big box locations – Walmart, Target, Walgreens, Shutterfly. With just a couple of clicks, they can see their albums and any of their friends albums in the application, select an image and hit print. It will be ready and delivered to them in no time. Unless you opt out of this feature.
Tagging is good for showcasing, but gives them access to your photos through the Facebook print feature at many labs, including Walmart, Walgreens, etc.
Visit these pages, and under the application click the Block Application button. You will then opt out of this application, which means your clients will not see your name if they try to use this application.
Did we miss any? Any other photo apps out there that we need to block as photographers?
Tuesday, February 12, 2013
How To Blog About Senior Portraits With A Questionnaire
Blog about senior portraits, with sample pre-session questionnaire. I suggest creating a questionnaire for your senior client to fill out before the session begins. You can either ask them to complete it via email or request that they come in early to their session to fill it out and then you can take some time to look it over. The disadvantage of not doing this means you have to try to spend the entire session getting to know your senior.

1. What is your favorite memory from your high school years thus far?
2. If you could go see any band, living or dead, in concert who would that be?
3. Who would you say is your best friend? How long have you known them? How did you meet?
4. Were you nervous about beginning high school?
5. What would you say is the first thing people notice about you?
6. What type of music is on your iPod?
7. What was your favorite movie growing up?
8. What is your favorite outfit?
9. Are you in any extra curricular activities?
10. What would be your dream car?
11. What memory of high school makes you laugh the most?
12. How would you like to be portrayed in your senior images?
13. What is a must have item for any high school student?
14. Is there a part of your body that your uncomfortable with (most of us have one)?
15. What are you passionate about?
16. Are you a fan of any sport teams or athletes?
17. What brand of clothing do you own the most of?
18. Where do you buy most of your clothing from?
19. What can you be found doing on the weekends?
20. Have their been any images that you have seen that you have liked? You can describe them to me instead of writing them down.
21. Okay, you’re probably sick of answering questions by now. Let’s finish this up with this last question; what is the most important thing to know about you?
After they have completed the questionnaire you can take time to glance over it and now you have conversation starters. On top of that, at this point your senior client will begin to feel more comfortable. Good luck with your senior session!
Monday, February 11, 2013
Starting Your Photo Business
1. Pick a Company name - something that is easy for your clients to remember, but is specifically “you”.
 2. Check with the Trademark & Patent Offices to assure the name is not already taken. *trademarking your name is always a great idea as well.. though it can be pricey
3. Register your company with your County, State and any Federal. You may need to do a DBA (doing business as), but it varies on states. I’m in Illinois and we must file a DBA if doing business under a name other than our “real name”.
 2. Check with the Trademark & Patent Offices to assure the name is not already taken. *trademarking your name is always a great idea as well.. though it can be pricey
4. Get a FEIN number. Getting FEIN number gives your company it’s own sort of “social security number”… so you don’t have to use YOURS when filing paper work on the company.
5. Business Licenses – These are not always necessary or required, but if they are required – you need them!
8. A Way to Accept the Money – Checks and cash can be easy at first, but you will want to accept credit cards. I use Square to accept my deposit payments online via credit card.
9. Business Insurance – If a ‘worst case scenario’ happens and you need to take care of a client’s broken ankle or someone stole your camera, business insurance is what’s going to protect you.
5. Business Licenses – These are not always necessary or required, but if they are required – you need them!
6. A Sales Tax License/Seller’s Certificate – In most US states and other countries you have to collect sales tax on the tangible items that you sell.
7. A Solid Contract – You want something that is truly thorough and has been looked over by a lawyer who has had years practicing in court. They know what will hold up in court and what won’t.
8. A Way to Accept the Money – Checks and cash can be easy at first, but you will want to accept credit cards. I use Square to accept my deposit payments online via credit card.
9. Business Insurance – If a ‘worst case scenario’ happens and you need to take care of a client’s broken ankle or someone stole your camera, business insurance is what’s going to protect you.
10. Start shooting your in business
Friday, February 8, 2013
5 Reasons Why You Should Rent Your Next Lens
Here are 5 Reasons Why You Should Consider Renting Your Next Lens (Or Other Camera Equipment):
1.Try before you buy – I get questions daily about what lenses or camera I use. Consider renting before
your next big purchase.
 2. Fill a short term need, such as a vacation or uncommon photo shoot – this is great when you will be
photographing things at different focal length that you usually do.
3. Replace lens or camera that is being repaired – when your equipment is not working properly or is in for cleaning or service, you do not have to be without.
4. Extra gear for backup during an important event such as a wedding – you should always have a backup during important events where a reshoot is impossible.
5. To creative – sometimes a fun lens, like a macro, tilt-shift, or fish-eye can get you thinking creatively. But you may not want to invest in one long-term.
Thursday, February 7, 2013
Creative Ways To Use The iPad In Your Photography Business
 1. In-person Sales. There is nothing like in-person sales. A gallery review with a client is a great opportunity to offer excellent customer service and even an opportunity for some print sales. I simply add a folder of all my clients photos so they show up in the iPad’s photo viewer and run a slideshow that way. I can hand my clients the iPad and they can flip through the photos, pick out their favorites and enjoy reliving their photoshoot or wedding. It’s a nice way for clients to see their photos and hold them in their hands. It’s also a great way for clients to envision what size they may like to hang on their wall.
2. Model Releases. There are a few apps that are great for contracts and model releases on the go. Easy If you’re out and about on the street shooting and captured a really great image and would like to be able to use it in your portfolio or sell it as stock you would want to have the subject’s permission. If you carry your iPad with you that’s easy.
- Release - Model Release App $9.99
- Top Model Release $8.99
- iRelease - the pro model release form app $8.49
- Model Release FREE
- ASMP Releases FREE
3. Useful tools.
- White noise app – I love using the WhiteNoise Light app during my newborn sessions.
- Music – I use Pandora for all non-newborn sessions.
- Weather – You can check the weather and sunrise/sunset easily using The Weather Channel for iPad app.
- Appointments – Use the integrated calendar to say on top of all your bookings.
- Learning – You can subscribe to photography magazines, purchase photography books digitally, or just follow your favorite blogs.
 4. Square-up! The iPad allows you to take payments using tools like Square. It is free to get an account and a credit card reader from Square. They do charge a small fee to use the service, but in my mind, the convenience is with the price!
5. You can use it to share your portfolio on the go!
6. Some wedding photographers also use their iPads to produce same-day wedding slideshows.
- PASS Fee
The Photographer’s Right
Your Rights and Remedies When Stopped or Confronted for Photography

Confrontations that impair the constitutional right to make images are becoming more common. To fight the abuse of your right to free expression, you need to know your rights to take photographs and the remedies available if your rights are infringed.
The General Rule
The general rule in the United States is that anyone may take photographs of whatever they want when they are in a public place or places where they have permission to take photographs. Absent a specific legal prohibition such as a statute or ordinance, you are legally entitled to take photographs. Examples of places that are traditionally considered public are streets, sidewalks, and public parks. Property owners may legally prohibit photography on their premises but have no right to prohibit others from photographing their property from other locations. Whether you need permission from property owners to take photographs while on their premises depends on the circumstances. In most places, you may reasonably assume that taking photographs is allowed and that you do not need explicit permission. However, this is a judgment call and you should request permission when the circumstances suggest that the owner is likely to object. In any case, when a property owner tells you not to take photographs while on the premises, you are legally obligated to honor the request.
www.aclu.org
Some Exceptions to the Rule
There are some exceptions to the general rule. A significant one is that commanders of military installations can prohibit photographs of specific areas when they deem it necessary to protect national security. The U.S. Department of Energy can also prohibit photography of designated nuclear facilities although the publicly visible areas of nuclear facilities are usually not designated as such. Members of the public have a very limited scope of privacy rights when they are in public places. Basically, anyone can be photographed without their consent except when they have secluded themselves in places where they have a reasonable expectation of privacy such as dressing rooms, restrooms, medical facilities, and inside their homes.
www.aclu.org
Permissible Subjects
Despite misconceptions to the contrary, the following subjects can almost always be photographed lawfully from public places:
Who Is Likely to Violate Your Rights
Most confrontations are started by security guards and employees of organizations who fear photography. The most common reason given is security but often such persons have no articulated reason. Security is rarely a legitimate reason for restricting photography. Taking a photograph is not a terrorist act nor can a business legitimately assert that taking a photograph of a subject in public view infringes on its trade secrets. On occasion, law enforcement officers may object to photography but most understand that people have the right to take photographs and do not interfere with photographers. They do have the right to keep you away from areas where you may impede their activities or endanger safety. However, they do not have the legal right to prohibit you from taking photographs from other locations.
www.aclu.org
They Have Limited Rights to Bother, Question, or Detain You
Although anyone has the right to approach a person in a public place and ask questions, persistent and unwanted conduct done without a legitimate purpose is a crime in many states if it causes serious annoyance. You are under no obligation to explain the purpose of your photography nor do you have to disclose your identity except in states that require it upon request by a law enforcement officer. If the conduct goes beyond mere questioning, all states have laws that make coercion and harassment criminal offenses. The specific elements vary among the states but in general it is unlawful for anyone to instill a fear that they may injure you, damage or take your property, or falsely accuse you of a crime just because you are taking photographs. Private parties have very limited rights to detain you against your will and may be subject to criminal and civil charges should they attempt to do so. Although the laws in most states authorize citizen’s arrests, such authority is very narrow. In general, citizen’s arrests can be made only for felonies or crimes committed in the person’s presence. Failure to abide by these requirements usually means that the person is liable for a tort such as false imprisonment.
www.aclu.org
They Have No Right to Confiscate Your Camera
Sometimes agents acting for entities such as owners of industrial plants and shopping malls may ask you to hand over your film. Absent a court order, private parties have no right to confiscate your camera. Taking your camera directly or indirectly by threatening to use force or call a law enforcement agency can constitute criminal offenses such as theft and coercion. It can likewise constitute a civil tort such as conversion. Law enforcement officers may have the authority to seize a camera when making an arrest but otherwise must obtain a court order. Law enforcement officers may not delete your photographs or video under any circumstances.
www.aclu.org
Police officers may not generally confiscate or demand to view your photographs or video without a warrant
If you are arrested, the contents of your phone may be scrutinized by the police, although their constitutional power to do so remains unsettled. In addition, it is possible that courts may approve the seizure of a camera in some circumstances if police have a reasonable, good-faith belief that it contains evidence of a crime by someone other than the police themselves (it is unsettled whether they still need a warrant to view them).
www.aclu.org
www.aclu.org
Permissible Subjects
Despite misconceptions to the contrary, the following subjects can almost always be photographed lawfully from public places:
- accident and fire scenes
- children celebrities
- bridges and other infrastructure
- residential and commercial buildings
- industrial facilities and public utilities
- transportation facilities (e.g., airports)
- Superfund sites criminal activities
- law enforcement officers
Most confrontations are started by security guards and employees of organizations who fear photography. The most common reason given is security but often such persons have no articulated reason. Security is rarely a legitimate reason for restricting photography. Taking a photograph is not a terrorist act nor can a business legitimately assert that taking a photograph of a subject in public view infringes on its trade secrets. On occasion, law enforcement officers may object to photography but most understand that people have the right to take photographs and do not interfere with photographers. They do have the right to keep you away from areas where you may impede their activities or endanger safety. However, they do not have the legal right to prohibit you from taking photographs from other locations.
www.aclu.org
They Have Limited Rights to Bother, Question, or Detain You
Although anyone has the right to approach a person in a public place and ask questions, persistent and unwanted conduct done without a legitimate purpose is a crime in many states if it causes serious annoyance. You are under no obligation to explain the purpose of your photography nor do you have to disclose your identity except in states that require it upon request by a law enforcement officer. If the conduct goes beyond mere questioning, all states have laws that make coercion and harassment criminal offenses. The specific elements vary among the states but in general it is unlawful for anyone to instill a fear that they may injure you, damage or take your property, or falsely accuse you of a crime just because you are taking photographs. Private parties have very limited rights to detain you against your will and may be subject to criminal and civil charges should they attempt to do so. Although the laws in most states authorize citizen’s arrests, such authority is very narrow. In general, citizen’s arrests can be made only for felonies or crimes committed in the person’s presence. Failure to abide by these requirements usually means that the person is liable for a tort such as false imprisonment.
www.aclu.org
They Have No Right to Confiscate Your Camera
Sometimes agents acting for entities such as owners of industrial plants and shopping malls may ask you to hand over your film. Absent a court order, private parties have no right to confiscate your camera. Taking your camera directly or indirectly by threatening to use force or call a law enforcement agency can constitute criminal offenses such as theft and coercion. It can likewise constitute a civil tort such as conversion. Law enforcement officers may have the authority to seize a camera when making an arrest but otherwise must obtain a court order. Law enforcement officers may not delete your photographs or video under any circumstances.
www.aclu.org
Police officers may not generally confiscate or demand to view your photographs or video without a warrant
If you are arrested, the contents of your phone may be scrutinized by the police, although their constitutional power to do so remains unsettled. In addition, it is possible that courts may approve the seizure of a camera in some circumstances if police have a reasonable, good-faith belief that it contains evidence of a crime by someone other than the police themselves (it is unsettled whether they still need a warrant to view them).
www.aclu.org
Your Legal Remedies If You Are Harassed, Stopped Or Detained For Taking Photographs
- Always remain polite and never physically resist a police officer.
- If stopped for photography, the right question to ask is, "am I free to go?" If the officer says no, then you are being detained, something that under the law an officer cannot do without reasonable suspicion that you have or are about to commit a crime or are in the process of doing so. Until you ask to leave, your being stopped is considered voluntary under the law and is legal.
- If you are detained, politely ask what crime you are suspected of committing, and remind the officer that taking photographs is your right under the First Amendment and does not constitute reasonable suspicion of criminal activity.
- If someone has threatened, intimidated, or detained you because you were taking photographs, they may be liable for crimes such as kidnapping, coercion, and theft. In such cases, you should report them to the police.
- You may also have civil remedies against such persons and their employers. The torts for which you may be entitled to compensation include assault, conversion, false imprisonment, and violation of your constitutional rights.
If you are disinclined to take legal action, there are still things you can do that contribute to protecting the right to take photographs.
- Call the local newspaper and see if they are interested in running a story. Many newspapers feel that civil liberties are worthy of serious coverage.
- Write to or call the supervisor of the person involved, or the legal or public relations department of the entity, and complain about the event.
- Make the event publicly known on an Internet forum that deals with photography or civil rights issues.
Most confrontations can be defused by being courteous and respectful. If the party becomes pushy, combative, or unreasonably hostile, consider calling the police. Above all, use good judgment and don’t allow an event to escalate into violence. In the event you are threatened with detention or asked to surrender your camera, asking the following questions can help ensure that you will have the evidence to enforce your legal rights:
- What is the person’s name?
- Who is their employer?
- Are you free to leave? If not, how do they intend to stop you if you decide to leave? What legal basis do they assert for the detention?
- Likewise, if they demand your camera, what legal basis do they assert for the confiscation?
With regards to videotaping, there is an important legal distinction between a visual photographic record (fully protected) and the audio portion of a videotape, which some states have tried to regulate under state wiretapping laws.
- Such laws are generally intended to accomplish the important privacy-protecting goal of prohibiting audio "bugging" of private conversations. However, in nearly all cases audio recording the police is legal.
- In states that allow recording with the consent of just one party to the conversation, you can tape your own interactions with officers without violating wiretap statutes (since you are one of the parties).
- In situations where you are an observer but not a part of the conversation, or in states where all parties to a conversation must consent to taping, the legality of taping will depend on whether the state's prohibition on taping applies only when there is a reasonable expectation of privacy. But that is the case in nearly all states, and no state court has held that police officers performing their job in public have a reasonable expectation. The state of Illinois makes the recording illegal regardless of whether there is an expectation of privacy, but the ACLU of Illinois is challenging that statute in court as a violation of the First Amendment.
- The ACLU believes that laws that ban the taping of public officials' public statements without their consent violate the First Amendment. A summary of state wiretapping laws can be found here.
This is a general education guide about the right to take photographs and is necessarily limited in scope. Note that the right to photograph does not give you a right to break any other laws. For example, if you are trespassing to take photographs, you may still be charged with trespass.
Learn More: Filming and Photographing Police
Friday, February 1, 2013
How To Build a Cyclorama Wall For Your Studio
Looking for a weekend project for your photo studio? Alrighty then. I’ve always called a cyclorama an infinity wall. It is a white background that curves as the bottom so you can’t see where the floor ends and the wall begins. There is no line there.
Here’s a great video by EyeHandy on how to build one. This is no simple project. They really build not only the curve, but also the floor.
Here’s a great video by EyeHandy on how to build one. This is no simple project. They really build not only the curve, but also the floor.
Monday, January 21, 2013
The A-Z Of Photography Slang
Are you often confused by some of the things your photographer friends say? Below is a compiled collection of common photography slang and obscure camera acronyms to help lift the veil on their mystery. This is by no means a complete list.
Artifact - A loose term to describe an element that degrades picture quality. Anything from the blockiness that can occur when pictures are heavily compressed as JPEGs, to the distortion to pictures that occurs with heavy manipulation – even the effect you see with lens flare.
Via: digitalcameraworld.com
ATGNI - All The Gear, No Idea. A photographer who has lots of camera equipment but doesn’t know what half of it does. A bit of an Uncle Bob, in fact (see below for Uncle Bob).
Via: digitalcameraworld.com
BIF - A rare acronym that you’ll only see floating around bird photography forums. There’s a clue right there: BIF stands for Bird in Flight, and is usually brought up during lengthy technical discussions about autofocus point selection and focus modes.
Via: digitalcameraworld.com
Bigma - The Sigma 50-500mm f/4-6.3 lens earned the nickname ‘Bigma’ thanks to its considerable 10x zoom range and considerable proportions.
Via: digitalcameraworld.com
Blown out - Bright areas in a photo that are overexposed are said to be blown out. They won’t hold any detail and will be bleached white.
Via: digitalcameraworld.com
Bokeh - Technically, bokeh is “the way the lens renders out-of-focus points of light,” but photographers usually only use the term to describe the appealing polygonal or round out-of-focus light created by wide-open glass.
Via: businessinsider.com
Chimping - While there’s little harm in taking a test exposure and reviewing it on the camera’s LCD screen, be wary of photographers who check every single exposure. They’re chimping, and the habit will make them miss more than the occasional shot.
Via: businessinsider.com
Clipping - This is what happens to the histogram when you grossly overexpose or underexpose a picture (find out how to read a histogram). In an overexposed shot, the histogram will usually be bunched up on the right and parts of it will be ‘clipped’ off by the edge of the graph. If the histogram is bunched up on the left and clipped by the opposite side of the graph, this usually indicates an underexposed photo.
Via: businessinsider.com
CTO - CTO is an abbreviation for “color temperature orange.” It’s the color of gel that comes with nearly all hot-shoe flashes, and its standard purpose is to color-correct the flash to match incandescent lighting.
Via: digitalcameraworld.com
DoF - An acronym for Depth of Field, or the zone of perceived sharpness in a picture that extends out from the point of focus towards the camera, and beyond it, towards the horizon.
Via: digitalcameraworld.com
Double truck - Magazines pay freelance photographers based on the printed size of an image. A double truck earns the most because it covers an entire two-page spread.
Via: businessinsider.com
Dragging shutter - When a slow shutter speed is used along with a flash, it’s referred to as “dragging the shutter.” The benefit is that it creates a natural-looking image by allowing ambient light into the background, while the flash lights the subject.
Via: businessinsider.com
Dust bunnies - DSLR sensors get dirty, especially when changing lenses outside in poor weather conditions. The resulting dust bunnies on the sensor turn into dark splotchy marks on every photo, which then must be digitally removed.
Via: businessinsider.com
Fast glass - Photographers say “glass” instead of “lens.” Fast glass refers to any lenses with an f/2.8 or wider aperture. When these lenses are shot at their widest aperture, they’re “wide open.”
Via: businessinsider.com
Fill-in - A blip of flash to brighten up the shadows in a daylight picture is known as fill or fill-in flash. Set the flash to Slow Sync mode, and the camera will take care of this for you, automatically balancing the ambient light and flash.
Via: digitalcameraworld.com
Flare - Flare is a (usually unwanted) effect of having bright light sources in the frame, or just out of the frame. When the light source is in the frame, bright/coloured artifacts can be seen in the image. When the light source is just out of the frame but hitting the front element of the lens, it can make the picture appear hazy and washed out. Shielding the front of the lens with a lens hood or your hand can prevent this.
Via: digitalcameraworld.com
Gobo - The acronym for “goes between optics,” a gobo is any object used to control the shape of light from its source. In Hot Shoe Diaries, Joe McNally describes how to use a number of different gobos, including soft boxes, barn doors, umbrellas, and gaffer tape.
Via: businessinsider.com
Grip and grin - The bane of event photographers, grip and grin photography is as uninspiring as it gets. It’s literally as simple as having your subjects squeeze close together and smile for the camera.
Grip and rip / Spray and pray - Both of these terms refer to the act of setting the camera to its highest continuous drive mode and keeping the shutter button held down to try and capture a fleeting moment. The theory is that the more frames you fill, the more chance there is of at least one of them being acceptably composed and sharp.
Via: businessinsider.com
Halos - A term used to describe the glow that’s created around the edges of objects when they’ve been over-sharpened in Photoshop or other similar photo editing software.
Via: digitalcameraworld.com
Long Tom - Rarely used by anyone other than the old guard of the photography world, ‘Long Tom’ can be used interchangeably for ‘telephoto lens’. The term is a direct reference to the Long Tom, a field gun used by the US Army during World World II.
Via: digitalcameraworld.com
Noise - Picture noise is the digital equivalent of film grain, although nowhere near as appealing (learn how to reduce noise at high ISO settings). Pictures become speckled and gritty as you increase the ISO sensitivity on the camera (because you’re essentially ‘turning up the volume’ on the light that’s being captured).
Via: digitalcameraworld.com
Nifty fifty - A 50mm lens with a maximum aperture of f/1.8 of faster is known as a ‘nifty fifty’. Lenses in this range are fast, lightweight and frequently optically superb. But the best bit is the price. The f/1.8 and f/1.4 50mm lenses are often the best value bits of glass you can buy.
Via: digitalcameraworld.com
Photography Magic hour/Golden hour - A term tossed about by earnest landscape photographers that refers to the time after dawn and before dusk where the sun tends to be at its warmest and most interesting. Shooting landscapes in this golden light gives pictures soul, man… (for more on how to use natural light, check out our guide See the light like a pro: everything you were afraid to ask about natural light).
Via: digitalcameraworld.com
Pixel peeper - Often found in online photography forums discussing the benefits of a FX camera sensor, rather than behind the lens making images, a pixel peeper is the Photoshop geek who opens an image file and immediately zooms into 600% to determine the image quality.
Via: businessinsider.com
Pap/Papping - Easy one this – Pap is the shortened version of Paparazzo and Papping is what they get up to.
Via: digitalcameraworld.com
Prime - A lens with a fixed focal length (such as 20mm, 50mm, 80mm). Zoom lenses cover a range of focal lengths (such as 80-200mm).
Via: digitalcameraworld.com
OOF - Out of Focus. An acronym often seen in online picture critiques As in “I like the way you’ve made the grass OOF”.
Via: digitalcameraworld.com
Racked out - A zoom lens is racked out at its longest focal length.
Via: businessinsider.com
RTFM - As in “What does X button do? How do activate Y mode? Where do I find Z function in the menu?” “RTFM!”
Often spat in the direction of people who repeatedly ask questions about their camera functions on internet forums, RTFM stands for Read The Frikkin’ Manual.
Via: digitalcameraworld.com
Shutterbug - An American term for a photographer who eats, drinks and sleeps photography. Shutterbugs carry a camera with them at all times and shoot absolutely everything without mercy.
Via: businessinsider.com
Shutter nutter - The British version of shutterbug. Shutter nutters are slightly less refined than shutterbugs, however, and can often be found at cruising camera trade shows, repeatedly photographing ‘booth babes’.
Via: digitalcameraworld.com
Soft focus - This term is pure photographer BS. It’s usually used to describe an image that isn’t sharp but is submitted to a client out of necessity.
Via: businessinsider.com
Stop - A stop is a measure of exposure, usually referred to as ‘EV’ (Exposure Value) in cameras. The aperture, shutter speed and ISO settings on a camera can all be measured in stops, although the actual figures used are different across all three. Each stop represents a doubling or halving of exposure.
Via: digitalcameraworld.com
Tog - The abbreviated form of ‘Photographer’ has become the Marmite of photography slang. You either love it or loathe it. It makes us feel slightly nauseous.
Via: digitalcameraworld.com
Touching up/retouching - The process of enhancing a picture in image editing software. This term is often used to describe the process of whitening eyes and teeth, and improving skin tone on a portrait, although the idea of ‘touching up a model’ is a little unsavory…
Via: digitalcameraworld.com
Uncle Bob - The name that wedding photographers give to a wedding guest who comes armed with a big DSLR, big lenses and expensive flash gun. Often used derogatorily, as in “A right Uncle Bob was always getting in my way.”
Via: digitalcameraworld.com
UWA - Acronym for Ultra Wide Angle lens.
Via: digitalcameraworld.com
Wide open - When a lens is set at its smallest f-number, such as f/2.8 or f/4, it’s being used ‘wide open’. At this point, the aperture (the hole in the lens) is at its maximum, letting in as much light as possible. Wide apertures mean shorter shutter speeds are required to take a picture, so lenses are often used wide open to take pictures of sport and action.
Via: digitalcameraworld.com
Zeroed - Zeroing a camera is as easy as returning it to its default settings — lowering its ISO, resetting the WB, and dialing in neutral exposure compensation. It’s a good habit to do at the end of every shoot, so that the camera is ready to go for the next session.
Via: businessinsider.com
Zoom creep - Not a dirty old man with a long lens, but rather what happens if you point a superzoom lens up or down, and the zoom position slowly shifts.
Via: digitalcameraworld.com
Monday, January 7, 2013
Adobe Is Giving Away Adobe CS2 Premium Plus (2005) for Free.
Adobe offers free downloads of its Adobe Creative Suite Premium Plus for Windows or Mac. (You do need an Adobe account to download the files, but it’s completely free to create one…) Included programs are Photoshop CS2, Photoshop Elements 4.0/5.0, Creative Suite 2, GoLive CS2, Illustrator CS2, InCopy CS2, InDesign CS2, and more. I've seen some comments saying it doesn't play well with current Mac OS - but Windows machines are fine with it apparently.


Friday, January 4, 2013
How To Build A Profitable Portrait Studio
Starting today Friday January 4 – January 6, photographer Bambi Cantrell will be sharing helpful tips that can help elevate your portrait photography career. Hosted by creativeLIVE, this workshop will be take place at Bambi’s studio in San Francisco. Join Bambi as she shows you how to take everyday materials to design stunning shooting spaces, and how to use available areas such as doors and windows for special effects. Throughout the 3 days, Bambi will cover how you can think smart and use your marketing money in the most efficient way, including marketing through local businesses, auctions and bridal fairs, as well as through creating a strong marketing brand. As with all creativeLIVE workshops, the LIVE event is FREE. Video downloads of the full 3-day event will cost $149. But when you pre-order now, you can get it for only $99.
Tuesday, January 1, 2013
Update your Metadata Preset to Include Your Copyright Year
Happy 2013, everyone! I hope all of your festivities were full of good fun and better company.
Don't forget to update your Metadata Preset to include 2013 as your copyright year! To those who manage metadata information as it pertains to copyright. I've made it a practice to create a new Metadata preset on the 1st of every new year in Lightroom, just to keep things tidy.
Simply click on the Preset in the Metadata Panel (on the right in Library) and choose 'Edit Presets' from the menu. Make sure to fill in all the details so that people can find you via your photo, then choose 'Save Current Settings as New Preset' from the Preset dropdown in the Edit Metadata Presets dialog!
Read more at

Subscribe to:
Posts (Atom)
